


Quick answer: The Fresh Roast SR800 (around $189) is the best budget-friendly purpose-built home roaster: 226 g capacity, 9-level heat control, real-time temperature display. A side-venting popcorn popper does the job for under $30. Switching from pre-roasted to green beans cuts your per-pound cost by 40–60%.
A 12 oz bag of single-origin Ethiopian from a good roaster runs $18–$28 in 2026. Roast the same coffee yourself from green beans and you're looking at $4–$7 for that same 12 oz. The equipment to close that gap doesn't have to cost much. A $30 stovetop popper is a legitimate first roaster. The Fresh Roast SR800 at around $189 gives you actual controls and repeatable results. This guide covers what's worth buying at each price point, what to skip, and enough about the roasting process that your first few batches don't end up in the bin.
What is home coffee roasting?

Home coffee roasting is exactly what it sounds like: you take raw green beans, apply heat, and bring them to whatever roast level you want. No roaster decided three months ago how your coffee should taste and then sealed it in a bag for you.
Green beans cost less than pre-roasted and hold quality for 12 or more months when stored properly in a cool, dry space. Pre-roasted specialty coffee peaks in flavor 5–14 days after roast and slides from there. When you roast at home, that freshness window is yours to control. Roast Wednesday, brew Friday, drink the best version of that coffee.
Why roast at home?
Four reasons hold up every time this comes up in serious coffee circles:
- Cost: green beans run $5–$10/lb from quality suppliers. Pre-roasted specialty coffee runs $15–$28/lb. Drink two bags a month and home roasting pays for a mid-range roaster in under a year.
- Freshness: you roast the day before you brew. Nobody else's timeline dictates when you get the best cup.
- Control: you pick the roast level for each origin. A Colombian Huila that tastes flat at Full City+ might be excellent at City+. You find out by roasting it that way.
- Learning: after 20 or 30 batches, you develop an ear for first crack and an eye for bean color that makes you a genuinely better coffee drinker.
Entry-level roasters have gotten meaningfully better and cheaper over the past several years. There's never been a lower barrier to getting started.
How does the roasting process work?
Three stages are worth understanding before your first batch.
Drying. Green beans carry around 10–12% moisture. The early part of roasting drives that water out. Beans stay greenish-yellow and smell grassy. This is where impatient beginners rush and end up with unevenly developed roasts. Let it go at its own pace.
Browning. Once bean temperature climbs past roughly 300°F (149°C), the Maillard reaction kicks in: sugars and amino acids convert into hundreds of aromatic compounds. Beans shift from tan to light brown and the smell changes from grassy to toasty. You'll notice it clearly when it happens.
First crack. Around 385°F (196°C), internal steam pressure builds until cell walls rupture. You hear a series of audible pops — lower-pitched and less frantic than popcorn, but unmistakable once you've heard them. Stop just after first crack for a light roast. Let the beans develop further for medium, or push into second crack for dark.
One more thing worth building into your routine: beans keep roasting on residual heat for 60–90 seconds after you pull them from the heat source. Fast cooling is part of the roast, not optional. Every machine worth buying includes a cooling mode or tray for exactly this reason.
What types of home coffee roasters are there?
The categories that actually matter for home use:
- Air (fluid-bed) roasters: hot air heats and circulates the beans simultaneously. Fast, consistent, and forgiving to learn on. Batch sizes are smaller — typically 70–226 g — but results are reliable. The Fresh Roast SR800 is the benchmark under $250.
- Drum roasters: a rotating drum tumbles beans over a heat source. More Maillard development, fuller body in the cup, and more forgiving with natural-process and honey-process coffees. Generally heavier and pricier than air roasters. The Kaffa Mini is the budget entry point for drum-style home roasting.
- Manual and stovetop roasters: no electronics, no automation. You agitate beans by hand over a burner and pay attention the entire time. Good for learning the fundamentals before committing more money. The Zenroast ceramic is the most recommended option in this category.
- DIY and repurposed methods: stovetop and hot-air popcorn poppers roast coffee for under $30. Not consistent enough for repeatable results, but a completely legitimate way to run your first batch.
If you want the easiest learning curve at the lowest price, start with an air roaster or a stovetop popper. If flavor development for naturals and honeys matters to you from the start, drum roasters are the step up.
What are the best budget roasting methods?
A. Stovetop Popcorn Popper
A stovetop popcorn popper runs $20–$40 and will roast 75–100 g of coffee in about 8–12 minutes over medium heat. You stir constantly, watch the color shift, listen for first crack, then dump the beans into a colander to cool. It works. The real limitation is batch-to-batch consistency: your hand speed varies, your burner output varies, and the results vary with them. A Whirley-Pop-style model with a stirring mechanism built into the lid is better than one you have to shake freehand. That built-in agitation makes a genuine difference on consistency.
B. Hot Air Popcorn Popper
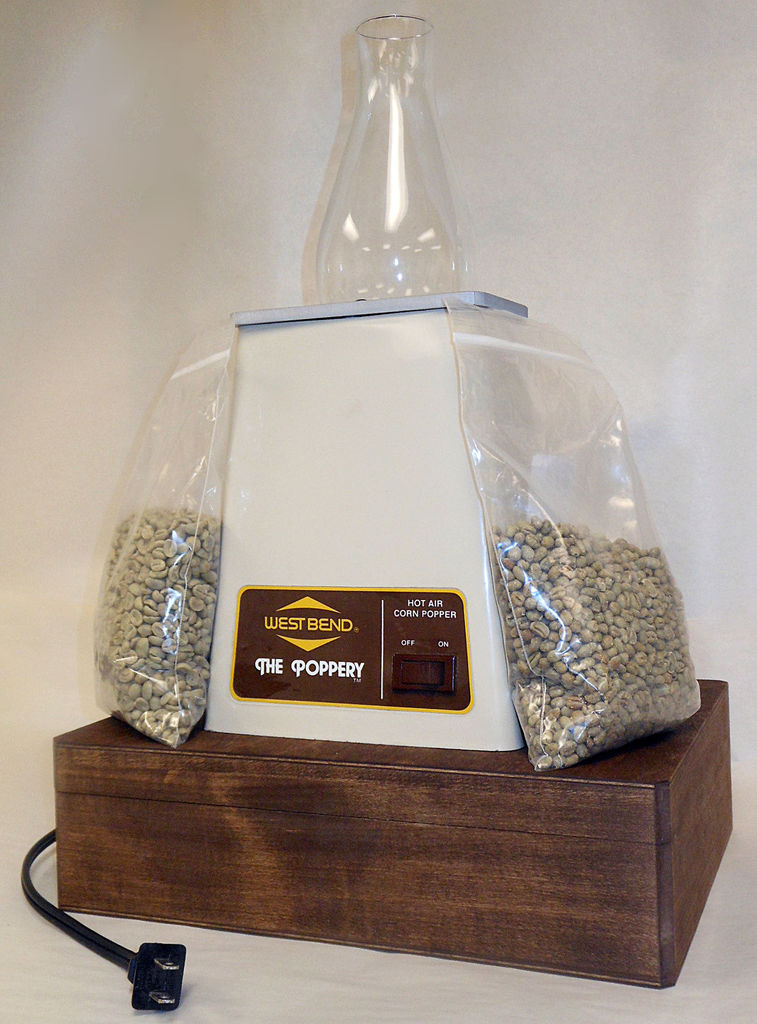
Side-venting hot-air poppers — not bottom-venting — produce enough airflow to actually roast beans rather than just warm them. Batch size is small (60–80 g max) and you've got essentially no temperature control. A West Bend Poppery II or similar side-venting model costs under $20 used. It's a reasonable way to run a first batch before committing to anything. Two honest caveats: it smokes more than most kitchens can handle, and you can't walk away from it.
C. Heat Gun and Bread Machine

A heat gun ($30–$60) aimed into a bread machine running on the dough cycle gives you a DIY drum-style setup. The bread machine rotates the beans; the heat gun supplies the heat. You'll want a thermometer to track temperatures at the bean mass, targeting 380–430°F, and good ventilation because chaff smoke is real. It produces better body than a popcorn popper and is genuinely flexible once you dial it in.
The practical downside: if your heat gun dies mid-roast, you've got a half-developed batch and no good options. Treat it as a bridge to your first real roaster, not a long-term practice setup.
D. Manual Hand Crank Roasters
Hand crank drum roasters are compact stainless steel cylinders with a handle and a drum you rotate over a burner. Capacities run 100–250 g. You manage everything manually: heat output, timing, and agitation speed. That hands-on approach is also what makes them useful teaching tools. Look for models with a built-in thermometer, and favor stainless steel over aluminum if you're using a gas flame regularly. Aluminum warps faster under sustained heat.
E. Budget Electric Drum Roasters

Entry-level electric drum roasters on Amazon run $80–$150. The common failure mode on cheap electric drums is uneven heat distribution: the element scorches beans on one side while the other side stays cooler. Before buying, look specifically for reviews that mention even roasting across the batch, not just the overall star rating. The Kaffa Mini sits at the upper end of this price range and is significantly more reliable than generic units.
F. Secondhand Roasters
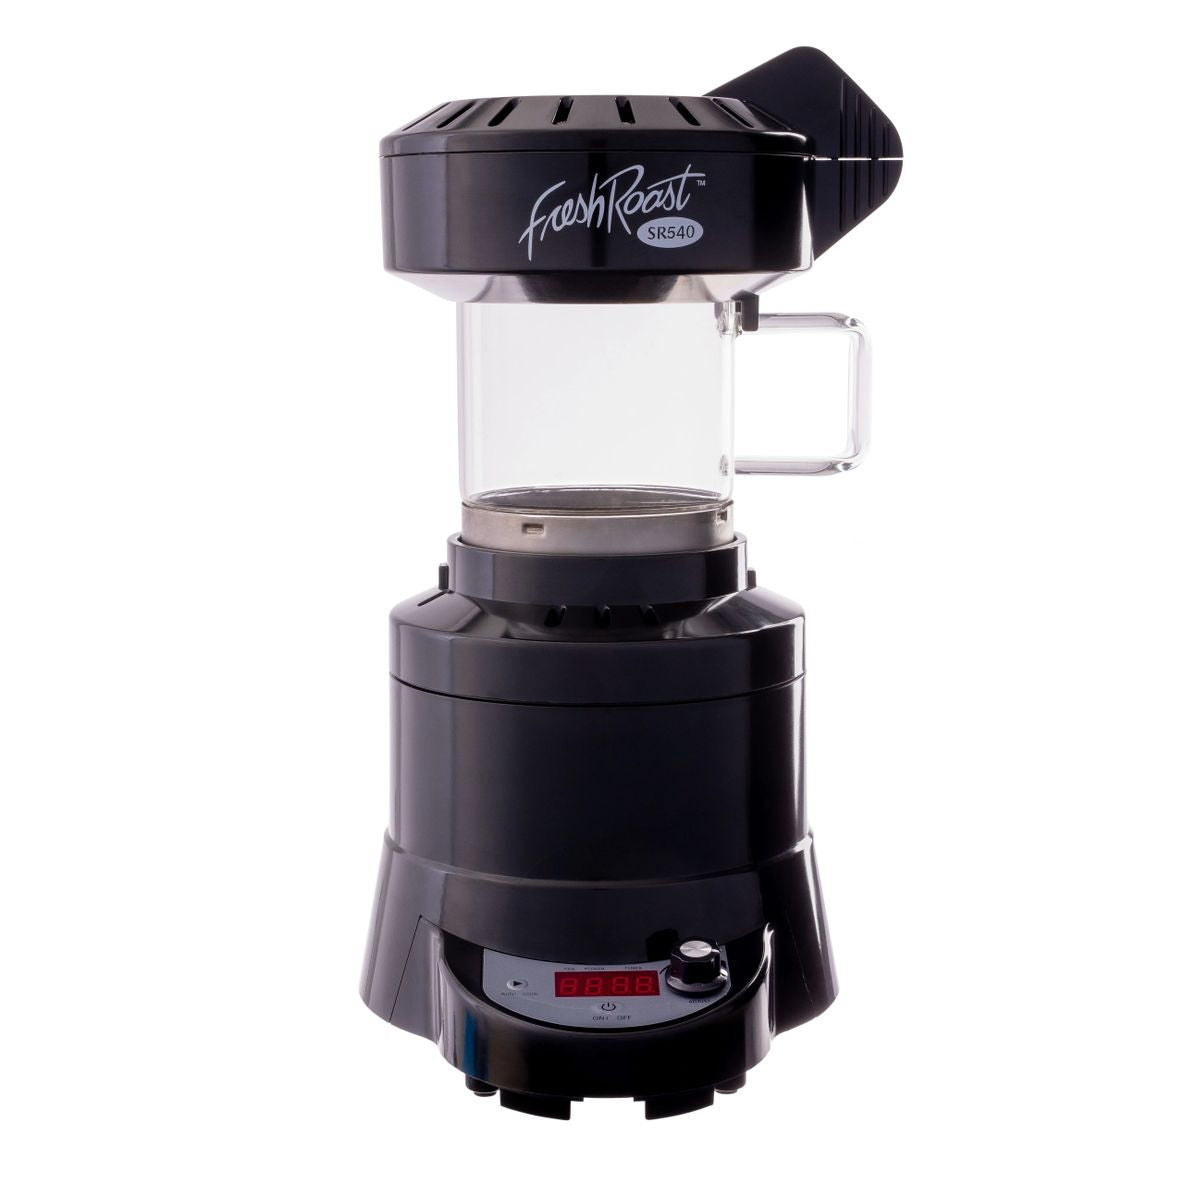
A used Fresh Roast SR540 or Gene Cafe CBR-101 on eBay or Craigslist runs $60–$120 and will outperform any new machine under $80. The SR540 has a large community behind it, cheap replacement parts, and well-documented troubleshooting. If you're buying used, check that the chaff collector seal is intact and that the heating element doesn't cycle erratically. Those are the two components most likely to be worn on an older unit.
G. Green Coffee Beans: The Biggest Cost Lever
This is where most of the actual savings come from. Green coffee has a much longer shelf life than roasted: stored properly in a cool, dry space, green beans hold quality for 12 or more months. Pre-roasted specialty coffee peaks within two weeks of roast and you're often drinking it well past that window.
Buying green beans in 5 lb increments and roasting weekly is the most reliable way to consistently drink fresh coffee without the cost of a specialty café habit.
Recommended roasters at CoffeeRoast Co.
1. Fresh Roast SR800
If someone asks me what roaster to buy first, I say the Fresh Roast SR800 without hesitation. It roasts 226 g of wet-processed beans per batch, or 170 g of dry-processed, in 8–12 minutes. Separate controls for heat level, fan speed, and time mean you're learning what each variable actually does instead of pressing "Auto" and hoping. The real-time temperature readout on the control panel is useful from your very first batch.
The one thing to stay on top of: the chaff collector fills quickly on naturals and dark roasts. Brush it clean every 20 batches or you'll start seeing inconsistent heat curves that have nothing to do with your recipe. That's the primary failure mode, and it's entirely preventable. Parts are widely available and inexpensive from CoffeeRoast Co. when something eventually needs replacing.
- Roast capacity: 226 g wet-processed / 170 g dry-processed (minimum 113 g)
- 9 levels of heat adjustment, manual control
- Real-time temperature readout
- Warranty: 1-year on base unit, 6-month on chaff basket and roasting chamber
- 120V only
2. Kaffa Mini Coffee Roaster
The Kaffa Mini is a compact stainless steel drum that holds 200 g (250 g max) and runs on a gas burner. No electronics. You manage heat through burner output and read the built-in thermometer. That sounds like a limitation, but it's what makes it a good teaching tool. Roast time runs 10–20 minutes depending on burner intensity and ambient temperature, and it's portable enough to use outdoors or take camping.

The stainless drum handles heat soak better than aluminum competitors at the same price. The trade-off: two back-to-back batches will land at different roast levels unless you let the drum temperature stabilize between loads. Build that rest time into your process from the start.
- Material: Stainless Steel
- Capacity: 200 g, max 250 g
- Dimensions: 260 mm x 240 mm x 200 mm
- Drum: 120 mm x 115 mm (2 mm wall thickness)
- Weight: 2.2 kg (manual), 2.5 kg (motorized variant)
- Gas burner required, not compatible with induction
If portability matters or you want the hands-on experience of managing heat manually, the Kaffa Mini is the right call. If you want electric controls and a more forgiving learning curve, start with the SR800.
Tips for getting the most out of a budget roaster
Roast smaller batches while you're learning. Every roaster has a rated max capacity and a real-world max capacity, and those aren't the same number. Load the SR800 at 170 g on your first batch, not 226 g. Load the Kaffa Mini at 180 g, not 250 g. Smaller loads heat more evenly and give you faster, clearer feedback on what the machine is doing. Batch efficiency can come later.
Cool fast and store smart. Let beans cool completely before sealing them in any container. Trapping heat causes condensation that accelerates staling. Use an opaque container with a one-way CO2 valve, at room temperature, away from light and strong odors. Skip the refrigerator: beans absorb other food smells through most storage containers. Plan to use roasted beans within 30 days, with the real flavor peak between days 5 and 14 post-roast.

Keep a roast log from batch one. Record the date, green bean origin, batch weight, heat settings, time to first crack, total roast time, and tasting notes. After 10 batches that log is worth more than any guide you'll read online. An Ethiopian Yirgacheffe and a Brazilian natural behave completely differently in the roaster — they need separate entries and separate baselines. Don't try to hold all of it in memory.
Frequently asked questions
How long does it take to roast coffee at home?
Most home roasters complete a batch in 8–15 minutes. Air roasters like the Fresh Roast SR800 typically run 8–12 minutes for a 170–226 g batch. Drum roasters and manual methods run 10–20 minutes depending on heat source and batch size. Darker roasts take longer than light roasts at the same batch weight.
Can I roast coffee in a regular oven?
Technically yes, practically no. Ovens lack the airflow to roast evenly and can't maintain the temperature consistency that makes repeatable results possible. You'll get beans scorched on the outside and underdeveloped in the center. A $20 stovetop popcorn popper is a better roasting tool than a kitchen oven every single time.
Can I reuse the chaff from coffee roasting?
Yes. Chaff is the dried inner skin of the coffee cherry, called the silverskin, and it's 100% organic. It works as garden mulch or compost material. Make sure it's fully dry before composting to avoid mold. It's not useful as a food ingredient.
How do I know when coffee beans are at my desired roast level?
Color and sound are your two primary signals. Light roasts are cinnamon-brown and reach first crack but don't go far past it. Medium roasts are medium-brown, developed 30–60 seconds past first crack. Dark roasts are dark brown to near-black and enter second crack territory — a faster, quieter cracking sound than first crack. If you're new, stop at light-to-medium first. You can always go darker on the next batch. You can't un-roast.
What's the minimum equipment I need to start roasting coffee at home?
A stovetop popcorn popper ($20–$40), a colander for cooling, and a bag of green coffee beans. That's a complete setup. Add a kitchen thermometer ($12) if you want temperature feedback. A purpose-built roaster like the Fresh Roast SR800 improves consistency significantly, but it's not required to get started.
How much does it cost to roast coffee at home vs. buying pre-roasted?
Green coffee beans from a reputable supplier cost $5–$10 per pound. Quality pre-roasted specialty coffee runs $15–$28 per pound. If you drink four pounds a month, savings range from $40–$72 per month. At that rate, a Fresh Roast SR800 pays for itself in roughly 3–5 months.
What green coffee beans should a beginner start with?
Wet-processed (washed) beans from Colombia, Guatemala, or Ethiopia are the most forgiving for beginners. They roast evenly, give clear first crack signals, and taste good across a range of roast levels. Avoid natural-process beans for your first few batches: they carry more chaff, roast less evenly, and need more attentive management.
Key takeaways:
- A stovetop popcorn popper gets you roasting for under $30. The Fresh Roast SR800 at around $189 is the best purpose-built budget roaster for beginners.
- Switching from pre-roasted to green beans cuts your per-pound cost by 40–60% and gives you beans that stay fresh for 12 or more months in storage.
- First crack (around 385°F / 196°C) is the primary signal for roast level. Listen for it and time from there.
- Keep a roast log from batch one. After 10 batches, your notes outperform any how-to guide.
- Load smaller batches than the machine's rated max while you're learning. Even heat distribution matters more than batch efficiency when starting out.


CoffeeRoast Co. Support
November 06, 2023
Hi James, thanks for sharing your experience! It’s great to hear from someone who’s experimented with different roasting methods. Your tip about securing the heat gun is a smart one, and the reminder about ventilation is much appreciated. Our readers can surely learn more from this. Happy roasting!